WWW.STARQUESTGARAGE.COM
THE ONLINE STARION & CONQUEST TECHNICAL REFERENCE
HEX BOLT HARDWARE UPGRADE TO THROTTLE BODY
PROBLEM:
The OEM StarQuest throttle body contains several screws that, over time and with constant heat, weaken and can easily strip when you need to remove them.
OBJECTIVE:
Replace ALL the OEM screws on the throttle body with new, stronger hex head metric bolts that will be easier to work with over time.
PROS:
(a) Brand new hardware
(b) Hex head bolts less prone to stripping
(c) Direct bolt-in replacements
(d) Cleaner looking throttle body
CONS:
(a) Throttle body MUST be removed from car to accomplish this work (so its best done when you need to rebuild your TB).
(b) Cost and availability of metric replacement hardware (about $10 at Home Depot April, 2004)
PARTS LIST:
6mm X 20mm Hex Head Bolts (QTY 2)
5mm X 16mm Hex Head Bolts (QTY 4)
5mm X 12mm Hex Head Bolts (QTY 8)
5mm X 10mm Hex Head Bolts (QTY 4)
4mm X 16mm Hex Head Bolts (QTY 2)
4mm X 10mm Hex Head Bolts (QTY 3)
6mm Lock Washers (QTY 2)
5mm Lock Washers (QTY 16)
4mm Lock Washers (QTY 5)
4mm Flat Washers (QTY 2)
TOOLS LIST:
Philips Head Screwdriver (medium tip)
5mm Hex Wrench/Key
4mm Hex Wrench/Key
3mm Hex Wrench/Key
Tap and Die Metric Set (optional)
Impact Screw Driver for locked screws (optional)
STARTING OUT:
NOTE: this guide and all photos contained herein are based on a 1988 Throttle Body.
With the TB off the car, find yourself a nice sturdy workbench to set up shop on. Make sure you work with the throttle body on a light colored rag so that any small parts that fall can be caught and seen. It is assumed that you are planning to do a TB rebuild and/or cleaning so go ahead and start that by removing only the screws necessary for that procedure. Rebuild the TB with the original hard but do NOT tighten the screws down. This will allow you to be certain the rebuild was done right and all the parts fit back together properly.
With the rebuild/cleaning complete, you can start loosening all other screws on the throttle body. Take your time and remember not force a screw that doesn't want to come out because you can always try an impact screw driver (this is not an air tool, its used with a hammer to remove stubborn screws). Keep in mind this guide aims to replace every screw on the TB which may be more than you really want as this includes the 3 screws used to mount the wire harness connectors to the TB. If you plan on replacing those as well, then loosen them up too.
Having loosened all the screws, you should have a pretty good idea of which holes may need to be chased with a tap. This is an optional but highly recommended step as it insures proper seating of your new hardware. With that said, let's get on with the program.
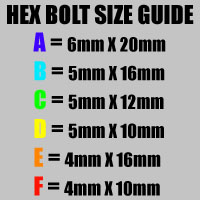
WHAT HEX BOLTS GO WHERE:
Here is a little chart to help you understand what size hex bolts go where in the following pictures. Basically, the rest of this procedure is like "paint by numbers" for you...just use the chart and subsequent pictures to replace all the OEM screws paying CLOSE attention to which hex bolts need lock washers and /or regular washers. It is HIGHLY suggested that you replace one screw at a time so as not to get confused by what washer is needed.
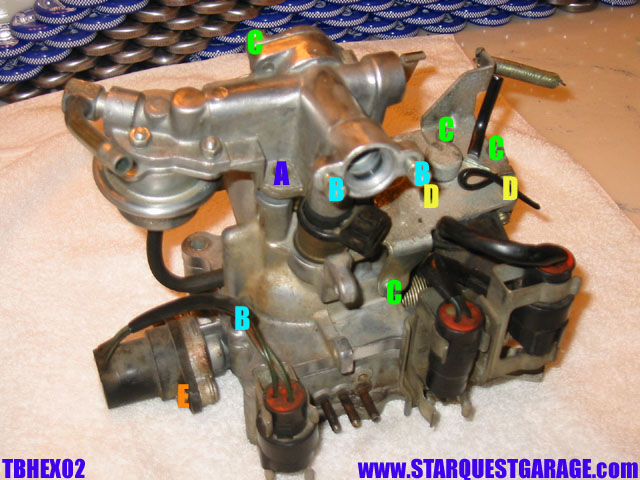
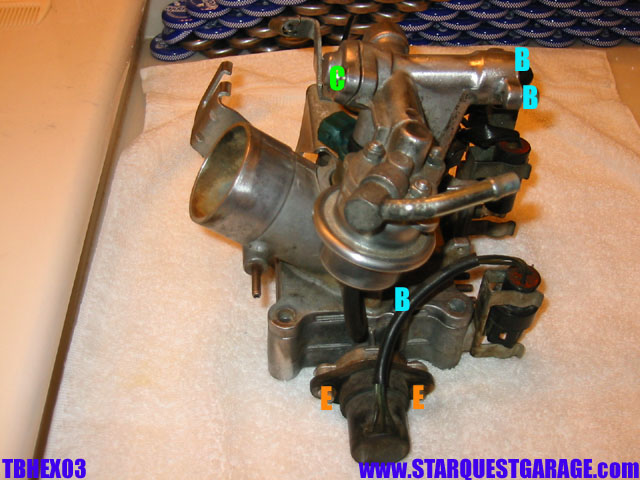
COMPLETE PICTORIAL GUIDE:
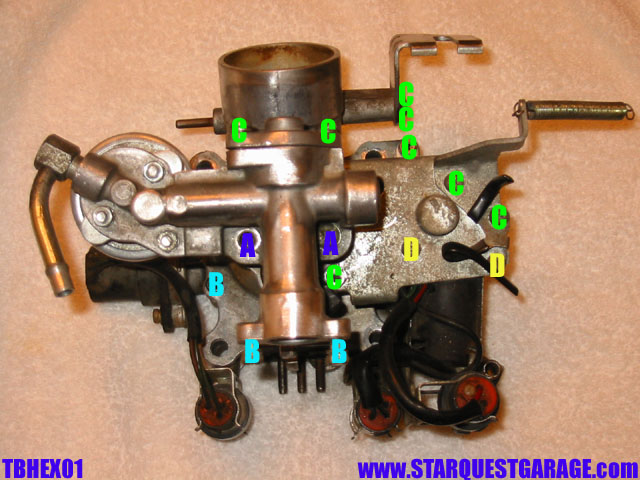
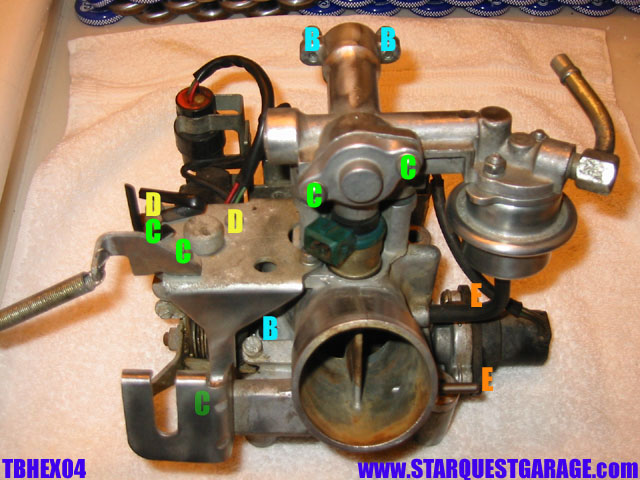
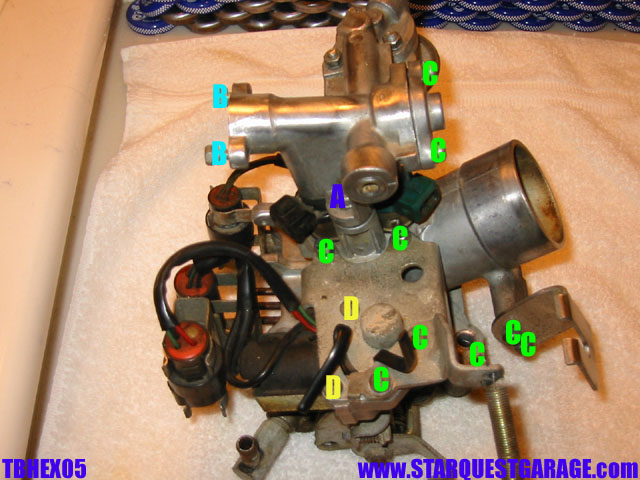
Note above there is one screw labled C near the bottom of the picture that appears to be right on the throttle cable mounting plate. This C is slightly opaque to call attention to the fact that there is a screw to be replaced with hex bolt C directly behind the plate. This same screw partially appears in the next picture but due to its odd location its hard to get a direct shot of. Don't forget to replace it.

COMPLETING THE PROCEDURE:
Take some time to make sure you have replaced every screw you set out to change along with their required locks/washers. Also, make sure all the new hex bolts are tightened properly insuring a good seal on vital parts. Once this is done, you need only reinstall the TB on the car. Please be care when starting your car again for the first time after rebuilding the TB and replacing all the hardware. It is best to have a friend start the car while you CAREFULLY watch the TB for leaks.